Raspberry Pi: Power On / Off A TV Connected Via HDMI-CEC
https://www.linuxuprising.com/2019/07/raspberry-pi-power-on-off-tv-connected.html
https://ubuntu-mate.community/t/controlling-raspberry-pi-with-tv-remote-using-hdmi-cec/4250
https://github.com/hex0cter/youtube-explicit/blob/master/bin/cec-remote.sh
With the help of cec-client (part oflibcec), your Raspberry Pi can control a device that supports CEC, like a TV, connected via HDMI. You could power the TV on or off, switch the active source, and more.
This should work with any Raspberry Pi version or model, including the original Raspberry Pi, as well as the latest Raspberry Pi 4.
A possible use case for this would be to connect to a Raspberry Pi via SSH and send a command to power on or off a TV connected to it via HDMI-CEC. Or you can use the commands to power on TV and make the CEC adapter the active source in a script, so that when you open some application on your Raspberry Pi, the TV that's connected to it via HDMI-CEC powers on and switches to your Raspberry Pi HDMI source. I'm sure you can think of various other use-cases.
CEC, or Consumer Electronics Control, is a feature of HDMI which allows controlling devices connected through HDMI using a remote control. For example, CEC is used to get the play/pause buttons on a remote control to control playback on a device connected via HDMI. Or when you play a video on a Chromecast with the TV off, and the TV automatically powers on and switches to the Chromecast source.
Most modern TVs and AV receivers should support HDMI-CEC. However, it's worth noting that you may need to enable CEC in the TV settings on some models. CEC may have a different name, depending on the device brand. For example, it's called Anynet+ for Samsung TVs, EasyLink or Fun-Link for Philips, SimpLink for LG, and so on.
To be able to power on (and off) a TV connected via HDMI to a Raspberry Pi, the first step is to install cec-client. On Raspbian, or some other Debian or Ubuntu based Linux distribution for Raspberry Pi, install thecec-utils package (cec-client is part of this package):
sudo apt install cec-utils
On other Linux distributions you'll have to search for cec-client or cec-utils in the repositories, or build libcec from source.
Now that cec-utils is installed, let's scan the CEC bus for available devices:
echo 'scan' | cec-client -s -d 1
In this command echo 'scan' sends the scan command to cec-client, -s is used so cec-client executes a single command and exists, and -d 1 sets the log level to 1 (errors only), so it's doesn't pollute your terminal with useless info.
Remember the TV (or other device connected via HDMI-CEC to your Raspberry Pi) device # and address, as we'll use that later on.
This is an example running this command on my Raspberry Pi that's connected to a Samsung TV via HDMI (with CEC support):
$ echo 'scan' | cec-client -s -d 1
opening a connection to the CEC adapter...
requesting CEC bus information ...
CEC bus information
===================
**device #0: TV**
**address: 0.0.0.0**
active source: no
vendor:        Samsung
osd string:    TV
CEC version:   1.4
power status:  on
language:      eng

device #1: Recorder 1
address:       1.0.0.0
active source: no
vendor:        Pulse Eight
osd string:    CECTester
CEC version:   1.4
power status:  on
language:      eng

currently active source: unknown (-1)
In this example, device number 0 with the 0.0.0.0 address is my Samsung TV, and device number 1 with the 1.0.0.0 address is my Raspberry Pi device.
Now that we know the device number and address, you can use the command that follows to power on a TV connected via HDMI-CEC to the Raspberry Pi:
echo 'on <DEVICE #>' | cec-client -s -d 1
Or:
echo 'on <DEVICE ADDRESS>' | cec-client -s -d 1
Both the device number (0 is the Samsung TV in the example above) and device address (0.0.0.0 is the Samsung TV device address from my example) should work.
-d 1 is to limit the log level to errors only, and you can use the command without it, but you'll see a long, probably useless log.
Example:
echo 'on 0' | cec-client -s -d 1
Or:
echo 'on 0.0.0.0' | cec-client -s -d 1
You'll also want to run theas command, which makes the CEC adapter the active source (so the TV switches to the Raspberry Pi HDMI source after the TV is powered on):
echo 'as' | cec-client -s -d 1
Want to turn the TV off (enter standby)? Use:
echo 'standby <DEVICE #>' | cec-client -s -d 1
Depending on how you use this, you may also need to check the current TV status (is it on or in standby?). This can be done using:
echo 'pow <DEVICE #>' | cec-client -s -d 1
To view all the commands that cec-client can send to a HDMI-CEC connected device, use echo h | cec-client -s -d 1:
Available commands:

[tx] {bytes}              transfer bytes over the CEC line.
[txn] {bytes}             transfer bytes but don't wait for transmission ACK.
[on] {address}            power on the device with the given logical address.
[standby] {address}       put the device with the given address in standby mode.
[la] {logical address}    change the logical address of the CEC adapter.
[p] {device} {port}       change the HDMI port number of the CEC adapter.
[pa] {physical address}   change the physical address of the CEC adapter.
[as]                      make the CEC adapter the active source.
[is]                      mark the CEC adapter as inactive source.
[osd] {addr} {string}     set OSD message on the specified device.
[ver] {addr}              get the CEC version of the specified device.
[ven] {addr}              get the vendor ID of the specified device.
[lang] {addr}             get the menu language of the specified device.
[pow] {addr}              get the power status of the specified device.
[name] {addr}             get the OSD name of the specified device.
[poll] {addr}             poll the specified device.
[lad]                     lists active devices on the bus
[ad] {addr}               checks whether the specified device is active.
[at] {type}               checks whether the specified device type is active.
[sp] {addr}               makes the specified physical address active.
[spl] {addr}              makes the specified logical address active.
[volup]                   send a volume up command to the amp if present
[voldown]                 send a volume down command to the amp if present
[mute]                    send a mute/unmute command to the amp if present
[self]                    show the list of addresses controlled by libCEC
[scan]                    scan the CEC bus and display device info
[mon] {1|0}               enable or disable CEC bus monitoring.
[log] {1 - 31}            change the log level. see cectypes.h for values.
[ping]                    send a ping command to the CEC adapter.
[bl]                      to let the adapter enter the bootloader, to upgrade
the flash rom.
[r]                       reconnect to the CEC adapter.
[h] or [help]             show this help.
[q] or [quit]             to quit the CEC test client and switch off all
connected CEC devices.
Hello everyone.
Description: I wrote a script that connects to HDMI CEC ( cec-client needed ) and listens for TV Remote key presses. Based on the keys pressed / released (or auto-released; holding down certain keys for too long makes them auto-release) different actions are executed. Some examples:
- write letters and numbers using 0-9 keys (simulating 3x4 keypad phones - key "2" switches between a-b-c-2, key 9 switches between w-x-y-z-9) ( xdotool needed )
- move mouse cursor using up/down/left/right (the longer you hold the key down, the faster it goes) and click (enter = left click; channels list = right click) ( xdotool needed )
- opening web sites in chomium (red key for YouTube, green for Google, blue for incognito window)
If you want to use firefox instead of chromium, replace "chromium" with "firefox" in the script below. Alternatively, you can just install chromium:
sudo apt-get install chromium-browser
See all the available keys below:
[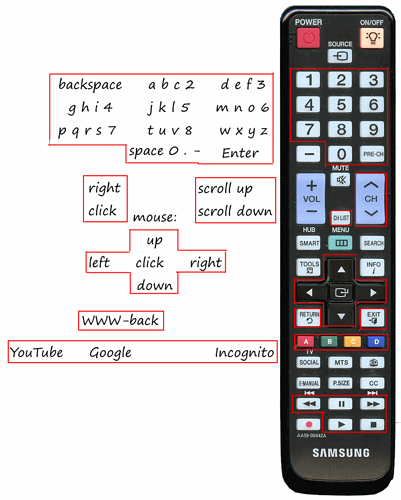
TVRemoteCECpng.png828×1030 101 KB
](https://ubuntu-mate.community/uploads/default/original/2X/e/e00e46bb720d634bb6a2ba84cad84c05078fd391.png)
These are the keys supported by my TV Remote. You can modify the script for your TV Remote, see Modification below.
Installation: First you need to install cec-client and xdotool; using terminal:
sudo apt-get install cec-client xdotool
Test if you can receive TV Remote button presses with cec-client; using terminal:
cec-client
You should see some diagnostic messages. Press numeric keys (as they are most likely to be supported) on your TV Remote. Watch out for new lines, especially of this form:
something something **key pressed: 8** something something
If you see this kind of messages, then this should work for you. If not, make sure you've got CEC enabled on your TV (see this WIKI 109 for more info). For my TV, pressing the Source button a couple of times helped (so it kind-of flips trough all the sources and circles back to the Raspberry Pi, detects CEC and connects to it).
So, on to the script / installation: Create the file cecremote.sh and mark it as executable; using terminal:
touch cecremote.sh
chmod +x cecremote.sh
Then open it; using terminal:
nano cecremote.sh
Copy - paste this in the file:
#!/bin/bash
function keychar { parin1=$1 #first param; abc1 parin2=$2 #second param; 0=a, 1=b, 2=c, 3=1, 4=a, ... parin2=$((parin2)) #convert to numeric parin1len=${#parin1} #length of parin1 parin2pos=$((parin2 % parin1len)) #position mod char=${parin1:parin2pos:1} #char key to simulate if [ "$parin2" -gt 0 ]; then #if same key pressed multiple times, delete previous char; write a, delete a write b, delete b write c, ... xdotool key "BackSpace" fi #special cases for xdotool ( X Keysyms ) if [ "$char" = " " ]; then char="space"; fi if [ "$char" = "." ]; then char="period"; fi if [ "$char" = "-" ]; then char="minus"; fi xdotool key $char
}
datlastkey=$(date +%s%N)
strlastkey=""
intkeychar=0
intmsbetweenkeys=2000 #two presses of a key sooner that this makes it delete previous key and write the next one (a->b->c->1->a->...)
intmousestartspeed=10 #mouse starts moving at this speed (pixels per key press)
intmouseacc=10 #added to the mouse speed for each key press (while holding down key, more key presses are sent from the remote)
intmousespeed=10 while read oneline
do keyline=$(echo $oneline | grep " key ") #echo $keyline --- debugAllLines if [ -n "$keyline" ]; then datnow=$(date +%s%N) datdiff=$((($datnow - $datlastkey) / 1000000)) #bla bla key pressed: previous channel (123) strkey=$(grep -oP '(?<=sed: ).*?(?= \()' <<< "$keyline") #bla bla key pres-->sed: >>previous channel<< (<--123) strstat=$(grep -oP '(?<=key ).*?(?=:)' <<< "$keyline") #bla bla -->key >>pressed<<:<-- previous channel (123) strpressed=$(echo $strstat | grep "pressed") strreleased=$(echo $strstat | grep "released") if [ -n "$strpressed" ]; then #echo $keyline --- debug if [ "$strkey" = "$strlastkey" ] && [ "$datdiff" -lt "$intmsbetweenkeys" ]; then intkeychar=$((intkeychar + 1)) #same key pressed for a different char else intkeychar=0 #different key / too far apart fi datlastkey=$datnow strlastkey=$strkey case "$strkey" in "1") xdotool key "BackSpace" ;; "2") keychar "abc2" intkeychar ;; "3") keychar "def3" intkeychar ;; "4") keychar "ghi4" intkeychar ;; "5") keychar "jkl5" intkeychar ;; "6") keychar "mno6" intkeychar ;; "7") keychar "pqrs7" intkeychar ;; "8") keychar "tuv8" intkeychar ;; "9") keychar "wxyz9" intkeychar ;; "0") keychar " 0.-" intkeychar ;; "previous channel") xdotool key "Return" #Enter ;; "channel up") xdotool click 4 #mouse scroll up ;; "channel down") xdotool click 5 #mouse scroll down ;; "channels list") xdotool click 3 #right mouse button click" ;; "up") intpixels=$((-1 * intmousespeed)) xdotool mousemove_relative -- 0 $intpixels #move mouse up intmousespeed=$((intmousespeed + intmouseacc)) #speed up ;; "down") intpixels=$(( 1 * intmousespeed)) xdotool mousemove_relative -- 0 $intpixels #move mouse down intmousespeed=$((intmousespeed + intmouseacc)) #speed up ;; "left") intpixels=$((-1 * intmousespeed)) xdotool mousemove_relative -- $intpixels 0 #move mouse left intmousespeed=$((intmousespeed + intmouseacc)) #speed up ;; "right") intpixels=$(( 1 * intmousespeed)) xdotool mousemove_relative -- $intpixels 0 #move mouse right intmousespeed=$((intmousespeed + intmouseacc)) #speed up ;; "select") xdotool click 1 #left mouse button click ;; "return") xdotool key "Alt_L+Left" #WWW-Back ;; "exit") echo Key Pressed: EXIT ;; "F2") chromium-browser "https://www.youtube.com" & ;; "F3") chromium-browser "https://www.google.com" & ;; "F4") echo Key Pressed: YELLOW C ;; "F1") chromium-browser --incognito "https://www.google.com" & ;; "rewind") echo Key Pressed: REWIND ;; "pause") echo Key Pressed: PAUSE ;; "Fast forward") echo Key Pressed: FAST FORWARD ;; "play") echo Key Pressed: PLAY ;; "stop") ## with my remote I only got "STOP" as key released (auto-released), not as key pressed; see below echo Key Pressed: STOP ;; *) echo Unrecognized Key Pressed: $strkey ; CEC Line: $keyline ;; esac fi if [ -n "$strreleased" ]; then #echo $keyline --- debug case "$strkey" in "stop") echo Key Released: STOP ;; "up") intmousespeed=$intmousestartspeed #reset mouse speed ;; "down") intmousespeed=$intmousestartspeed #reset mouse speed ;; "left") intmousespeed=$intmousestartspeed #reset mouse speed ;; "right") intmousespeed=$intmousestartspeed #reset mouse speed ;; esac fi fi
done
Finally, save it; using nano in terminal: press "Ctrl+X" to close the file, then "Y" to confirm saving, then "Enter" to save the file under the right file name
Try executing it, using terminal:
cec-client | ./cecremote.sh
At this point it should be working.Point the TV Remote at the TV, press up/down/left/right and check if the mouse pointer is moving.
Press 9 44 2 8 7777 0 88 7 and it should write "whats up".
The script doesn't output anything, except when it encounters a button press that it doesn't recognize, or it doesn't have a function set up for that button yet (play button being one of them). If you want it to output all the messages it receives, find the line and uncomment it by deleting the # : #echo $keyline --- debugAllLines
So, if everything works, exit the script in terminal: Press Ctrl+C
Run at startup: If you want to start this script every time the Raspberry starts, create a new file called cecremotestart.sh and mark it as executable; using terminal:
touch cecremotestart.sh
chmod +x cecremotestart.sh
Then open it; using terminal:
nano cecremotestart.sh
Copy - paste this in the file:
#!/bin/bash
cec-client | /home/raspberry/cecremote.sh #<-- change this according to your username / path to the script
Finally, save it; using nano in terminal: press "Ctrl+X" to close the file, then "Y" to confirm saving, then "Enter" to save the file under the right file name
Then add this in the Startup Programs (Menu - System - Control Center - Startup Programs; Add; Give it a name, and enter the path (or press Browse) of the script in the filesystem).
Restart, try, report 
Modification:If you want, you can edit the script to change or add the commands executed on certain button presses.
You can detect the additional buttons that CEC on your TV supports. Kill the running cec-client, run the cec-client in the terminal, and watch for the output while you're pressing all the keys on your TV Remote; using terminal:
killall cec-client
cec-client
Ctrl+C when you're ready to stop
Edit the script, then execute the modified script by manually executing cecremotestart.sh; using terminal:
./cecremotescript.sh
Ctrl+C to stop
When you're satisfied, just restart your Raspberry PI.
That's it from me - a simple and crude way to control your Raspberry PI with the TV Remote, for when you don't have the keyboard/mouse connected and VNC-ing is too much of a bother.
Try it and report